


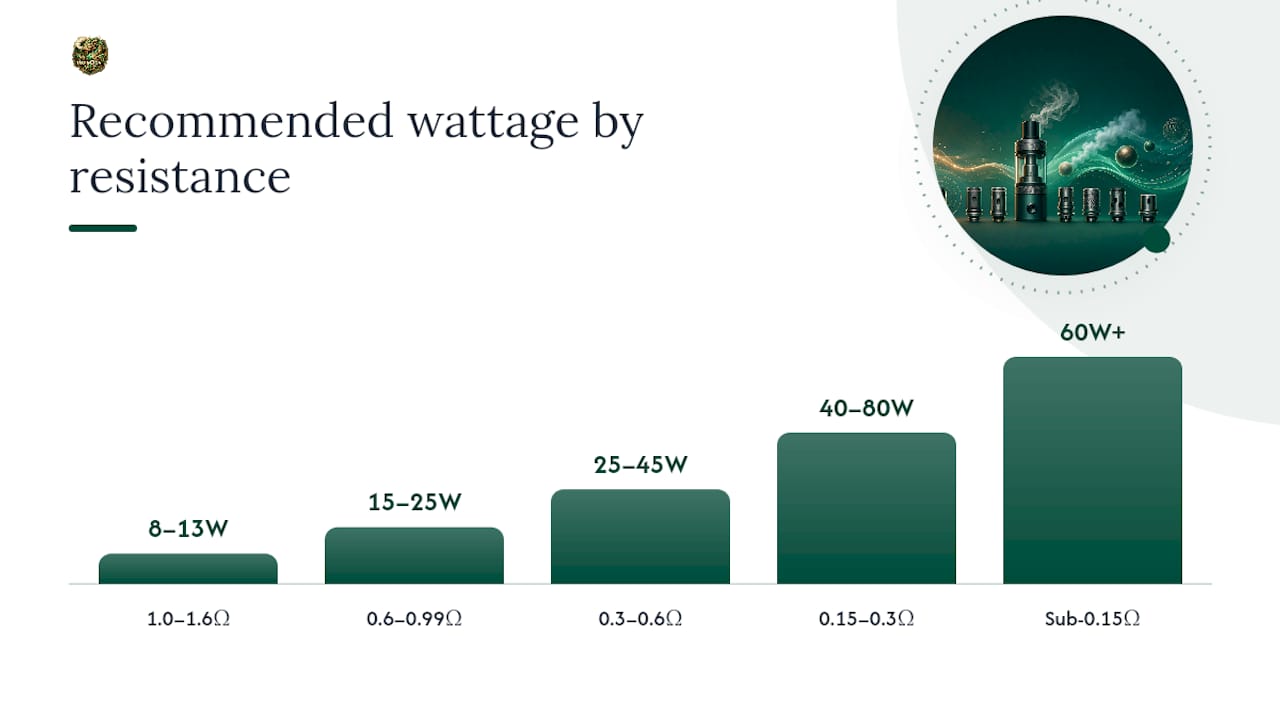
Setting the right vape wattage for coils comes down to one rule above all others: follow the printed range on your coil. When that range is missing or you want to dial in the sweet spot within it, use these starting points based on resistance-to-wattage mapping from manufacturer-tested bands:
- 1.0–1.6Ω (MTL, nic salts, pod systems): 8–13W
- 0.6–0.99Ω (restricted DTL, RDL): 15–25W
- 0.3–0.6Ω (sub-ohm DTL, mesh): 25–45W
- 0.15–0.3Ω (high-power DTL, mesh): 40–80W
- Sub-0.15Ω (advanced builds): 60W+
Never exceed the coil’s printed maximum wattage. Doing so burns the wick, kills the coil, and can stress your battery in a single session.
Key Takeaways
The most reliable way to set vape wattage for coils is to start at the printed low end, increase in 2–3W steps, and stop when flavor peaks without any dryness or harshness.
| Point | Details |
|---|---|
| Follow the printed range | The coil’s manufacturer range is the primary guide; generic tables are a fallback only. |
| Start low, tune up | Begin at the bottom of the range and increase in 2–3W steps until flavor peaks. |
| Prime every new coil | Saturate the wick for 5–10 minutes before the first draw to prevent burnt hits. |
| Check device and battery limits | Confirm your mod’s max wattage and your battery’s amp rating before increasing power. |
| VapeCiga for coils and mods | VapeCiga stocks replacement coils and regulated mods across every resistance band, shipping fast across the US. |
Table of Contents
- How does wattage actually change your vape?
- Recommended wattage ranges by resistance and coil type
- How to find the sweet spot for any coil
- Device limits, battery safety, and coil care
- Real device and coil examples from VapeCiga
- What most vapers get wrong about wattage
- VapeCiga has the coils and mods to put this into practice
- Sources
How does wattage actually change your vape?
Wattage is simply the rate at which your device pushes power into the coil. More watts means a hotter coil, and that heat cascade touches everything: flavor, vapor volume, throat hit, and how long the coil lasts.
The effects break down like this:
- Flavor: There’s a sweet spot, usually in the middle third of the printed range. Below it, the coil underheats and flavor goes flat. Above it, sweeteners caramelize on the cotton and you get a muted, slightly acrid taste.
- Vapor volume: Higher watts produce denser clouds, but only up to the point where your wick can keep up. Push past that and the cotton dries out faster than it saturates.
- Throat hit: Warmer vapor hits harder. If you’re chasing a cigarette-like hit on a 1.2Ω coil, a few extra watts can deliver it. If you’re cloud-chasing on a 0.2Ω mesh, the throat hit at 80W is already substantial.
- Coil life: Running near the top of the range consistently shortens coil life. Real-world users typically find the best flavor closer to the middle of the range, not the top end.
Coil construction changes the math. Mesh coils heat more evenly than standard round wire, which means they often have a narrower usable window but deliver consistent flavor across it. Clapton coils have more surface area and mass, so they need a few extra watts to reach the same temperature as a simpler build. Ceramic coils are more heat-tolerant and can handle the upper end of a range without the same gunking risk. Dual coils essentially halve the resistance and demand roughly double the wattage of a single coil at the same resistance.
Airflow and e-liquid VG/PG ratio also shift where your sweet spot lands. A high-VG juice (70/30 or above) is thicker and needs more heat to vaporize fully, so you’ll often run 5–10W higher than you would with a 50/50 mix. Tighter airflow concentrates heat and can make the same wattage feel warmer than it does on a wide-open draw.
Pro Tip: If you’re running a sweetener-heavy dessert juice, expect the coil to gunk faster at high wattage. Drop 3–5W from your usual setting and clean the coil more frequently. Fruit flavors, by contrast, often shine at lower wattage and are gentler on cotton.
Recommended wattage ranges by resistance and coil type
Use the coil’s printed range first. This table is a fallback when that information isn’t available, and a useful cross-check when it is.
| Resistance Band | Wattage Range | Best For | Coil Type Notes |
|---|---|---|---|
| 1.0–1.6Ω | 8–13W | MTL, nic salts, tight draw | Standard wire, ceramic pod coils |
| 0.6–0.99Ω | 15–25W | RDL, freebase or nic salt | Mesh or standard; 50/50 to 60/40 VG/PG |
| 0.3–0.6Ω | 25–45W | Sub-ohm DTL, flavor-focused | Mesh, clapton; 60/40 to 70/30 VG/PG |
| 0.15–0.3Ω | 40–80W | DTL, cloud production | Mesh, dual coil; 70/30+ VG/PG |
| Sub-0.15Ω | 60W+ | Advanced DTL, max vapor | Complex builds; high-VG only |
A few clarifications worth keeping in mind:
- 1.0–1.6Ω: Nic salts generally used; freebase nicotine can be harsh at high strengths.
- 0.6–0.99Ω: Typical range for restricted direct-lung vaping; wattage depends on device and style.
- 0.3–0.6Ω: Mesh coils perform well with higher VG mixes; different coil types may require wattage adjustments.
- 0.15–0.3Ω: Sub-ohm direct-lung vaping; monitor battery limits when using higher wattage.
- Sub-0.15Ω: Advanced builds only. Most regulated mods handle these safely, but always verify your device’s maximum output and your battery’s continuous discharge rating.
Manufacturer note: The printed range on the coil is the manufacturer’s tested recommendation. It accounts for that specific coil’s wire gauge, mass, and wick material. Generic tables like the one above are a starting point, not a substitute.
How to find the sweet spot for any coil
Start low, increase in small steps, and stop the moment flavor peaks without any dryness. That’s the whole method. Here’s how to execute it:
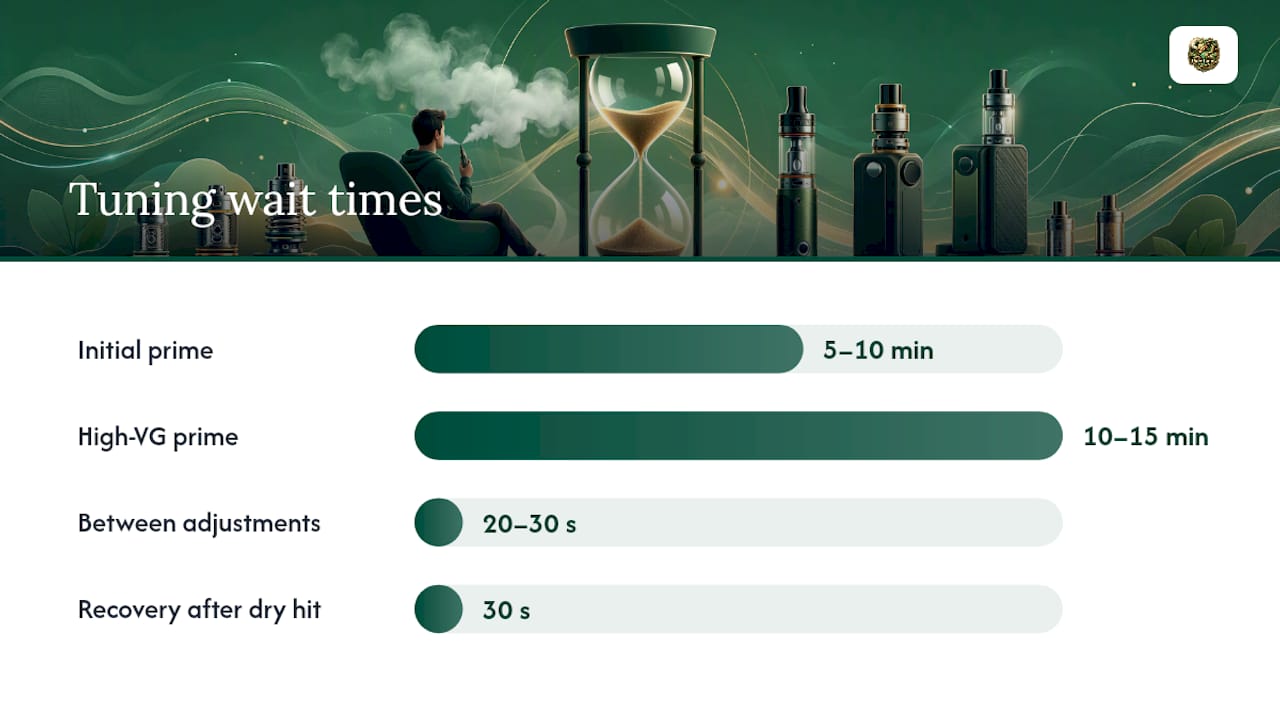
- Prime the coil. Drip 3–5 drops of e-liquid directly onto the cotton wicking ports and the top of the coil head. Fill the tank and let it sit for 5–10 minutes before firing. Skipping this step is the single most common cause of a burnt first hit.
- Set wattage to the low end of the printed range. If the coil says 25–40W, start at 25W. If there’s no printed range, use the resistance table above and start at the bottom of that band.
- Take a short test pull (2–3 seconds). Inhale slowly. Note the warmth, flavor intensity, and vapor density.
- Increase by 2–3W. Wait 20–30 seconds between adjustments to let the wick re-saturate. Starting at the low end and increasing in small steps is the standard method across manufacturers.
- Stop when flavor peaks. You’ll notice a point where the vapor tastes richest and warmest without any harshness. That’s your sweet spot. Write it down.
- Back off immediately if you get a dry hit. A scratchy, papery taste means the wick isn’t keeping up. Drop 3–5W and give the coil 30 seconds to recover. If the burnt taste persists, the coil may already be damaged.
Safety checks before you start: Confirm your device’s maximum wattage output. Confirm your battery’s continuous discharge rating (CDR) in amps. A 0.2Ω coil at 80W draws 20 amps; a battery rated for 15A continuous discharge isn’t the right cell for that build. Use the battery your device manufacturer recommends.
Pro Tip: High-VG shortfills (70/30 or above) and thick dessert juices need a longer prime and a slower ramp-up. Let the tank sit 10–15 minutes after filling, and take three or four very short “primer puffs” without firing the device before your first real draw. This saturates the wick fully and prevents the dry hit that ruins a new coil.
Device limits, battery safety, and coil care
Always check three things before increasing wattage: your device’s maximum output, your battery’s amp limit, and the coil’s printed maximum. Missing any one of them is how vapers burn coils, drain batteries dangerously fast, or get a dry hit on a brand-new coil.
Safety checklist for a new coil install:
- Confirm the coil’s resistance matches what your device reads (within ±0.05Ω is normal).
- Check the device is in Variable Wattage (VW) mode, not Temperature Control (TC), unless you’re using a TC-compatible wire like nickel or titanium.
- Verify your battery’s CDR rating. Low-ohm coils draw more current because resistance and current are inversely related: halving the resistance roughly doubles the current draw at the same voltage. A 0.15Ω coil at 4V draws about 26 amps. That’s a high-drain cell requirement.
- Use only the battery type your device specifies. Mismatched cells are a safety risk, not just a performance issue.
- Watch for device temperature warnings. If the mod gets hot to the touch during normal use, something is wrong.
Temperature control mode is worth knowing about even if you don’t use it daily. TC limits coil temperature rather than raw power, which makes it useful for vapers who consistently get dry hits despite careful wattage tuning. It requires a TC-compatible coil wire (nickel, titanium, or stainless steel in TC mode) and a device that supports it.
Troubleshooting common wattage problems:
- Burnt taste: Wattage too high, wick not saturated, or coil past its life. Drop wattage first; if the taste persists, replace the coil.
- Gurgling or flooding: Wattage too low for the coil to vaporize e-liquid efficiently, or the tank is overfilled. Increase wattage 3–5W or clear the chimney.
- Leaking: Often a wicking mismatch. If wattage is too low, e-liquid floods the coil faster than it vaporizes. Try a slight wattage increase before assuming a hardware problem.
Pro Tip: Coil life varies by juice type more than most vapers expect. A clean 70/30 freebase juice can run a coil for two weeks. A max-VG dessert with heavy sweetener can gunk the same coil in three days at the same wattage. If you’re burning through coils fast, drop 5W and switch to a lower-sweetener juice before buying more hardware.
Real device and coil examples from VapeCiga
These are devices and coils available at VapeCiga, with the wattage context that matters for each.
-
2027 Date 7 2000: A compact pod device suited to MTL use. Compatible with coils in the 0.8–1.2Ω range, running comfortably at 10–18W. Ideal for nic salts and tight-draw vapers.
-
Packspod 5000: A closed-system disposable with a fixed internal coil. No wattage adjustment needed; the device manages output automatically. Good reference point for what a factory-set MTL wattage feels like.
-
EBCREATE BC40000 PRO: High-capacity device with a mesh coil system. Operates in the mid-wattage range typical of 0.6–0.8Ω mesh coils (15–25W equivalent output), optimized for consistent flavor over long sessions.
-
GeekVape T200 (Aegis Touch) Mod: A full-featured regulated mod with a 200W ceiling and TC support. Pairs well with sub-ohm mesh coils in the 0.15–0.4Ω range at 40–80W. The touchscreen makes wattage adjustments fast and precise. Compatible with GeekVape mesh coils for the Zeus tank.
-
Vaporesso Swag II VW Box Mod 80W: An 80W single-battery mod that covers the full range from MTL pod coils up to 0.2Ω sub-ohm builds. The 80W ceiling means it handles most coils short of the most extreme low-resistance builds. A practical all-rounder for vapers who switch between styles.
-
Vaporesso GTX One Vape Mod 2000mAh 40W: A 40W integrated-battery device built for the GTX coil platform. The GTX coil range covers 0.6Ω (around 20–28W) and 0.8Ω (around 12–20W), both well within this device’s output. A strong pick for RDL vapers who want smooth mesh performance without carrying a dual-battery mod.
Pro Tip: For coil types without a printed range (some rebuildable coil heads and DIY builds), use the resistance table in this guide as your starting point and apply the step-up method from Section 4. The process is identical; you’re just working without a printed floor.
What most vapers get wrong about wattage
The most common mistake is treating wattage as a performance dial rather than a temperature setting. Vapers push to the top of the range because higher numbers feel like better performance. They’re not. They’re just hotter. Flavor peaks in the middle of the range for most coils, and chasing maximum watts shortens coil life without delivering proportionally better vapor.
The second mistake is ignoring the interaction between wattage and e-liquid. Wattage doesn’t work in isolation. Resistance is a clue, not a command. The same 0.4Ω coil will behave differently with a 50/50 fruit juice at 30W than it will with a 70/30 dessert at the same setting. Adjust for the juice, not just the coil.
If you consistently get dry hits despite careful priming and a sensible wattage, temperature control is worth trying. It’s not a feature most vapers need daily, but for anyone who runs high-sweetener juices or pushes sub-ohm builds hard, TC mode on a compatible device removes the guesswork about when the coil is running too hot.
VapeCiga has the coils and mods to put this into practice
Finding the right wattage is only half the equation. You also need a coil and device that give you the range to work with. VapeCiga stocks the full lineup: replacement coils across every resistance band, regulated mods from 40W pod devices up to 200W+ advanced builds, and the e-liquids to match.
Whether you’re setting up a new Vaporesso GTX One for RDL use or stepping into sub-ohm territory with the GeekVape T200, VapeCiga ships fast across the US with a selection built for adults 21+ who know what they want. Browse the full coil and mod catalog at Vapeciga and match your next coil to the right device from the start.